In this session we continue the development of our custom Sharepoint solution, discussing hosting configuration options for Internet accessibility, and configuring Sharepoint for email notifications (and inbound email). We also discuss automated email notifications through custom workflows.
Hosting tips, Email & Notifications
Note: If you are only running your Sharepoint system inside your corporate network, this section may not be as helpful, as a lot of your work may have been done for you by your IT group.
However, if you are working with dispersed teams and are hosting Sharepoint for your team on the Internet, there will be a lot of useful information for you in this topic.
Hosting - making Sharepoint visible to your team
You may face a number of options and decisions in this area.
- Do you have domain registered?
- Do you have a static IP?
- Are you serving from your corporate network to the Internet?
- Are you hosting your server from a home office?
Note: If you are hosting the server from your corporate network, you will be best to work with your IT team on setting things up, as there will be security policies and other configuration requirements specific to your network.
So- as this is a discussion of developing systems cheaply, let's start with the simple stuff first, with the model of setting up the server to share to a dispersed team over the Internet. We will assume that you are starting with a single server, hosted on your small business or home office network. You will have an Internet router (Cable, DSL or Fibre) into your network, and you will need to have access to the administrator login on the router, or get the assistance of the person who does.
The steps we need to look at are:
- How you connect to the Internet
- Setting up Port Forwarding
- Updating IIS for your external Domain (or subdomain) name
1. Where am I? Static IP vs Dynamic IP
Static IP
A static IP address means that the address for your router never changes; the specific address is allocated to you by your internet service provider. Static IP's are usually included in your Business Internet Plan at no additional cost. If you are on a personal plan, discuss the option with your provider.
If you have a Domain registered for your business and already run a website, you will already have a Static IP. (Note that if you plan to host your website and sharepoint both, you will either need to run the Sharepoint site as a sub-site on your main server, or use a non-standard port like :81)
If you would like to register a domain and have a Static IP (or need a whole site), there are a number of domain registrars and hosting providers. There are many good articles on how to do this.
Important Note: Inside your network, the default addressing method will probably be DHCP. You will need to have a Fixed IP address for the server inside your network. You will need to do this in two parts:
a) Figure out what the Dynamic IP address range is on your router - and stay away from addresses in that range.
b) Setup your networking configuration on your Sharepoint Server to use a Static IP instead of DHCP (automatically assign). You will need to change the Adapter settings under Network Connections.
Open the Properties for TCP/IPv4. It should look something like this when you are done:Dynamic IP
A Dynamic IP means that your provider uses DHCP to assign your router an IP address for a period of time (a "lease") and the next time your lease is renewed (often 1, 7 or 30 days), you may be assigned a new IP address.
You can still present your server to the world with a dynamic IP, however as the IP can change regularly, you need a service such as DynDNS Free (free for up to two host names). The limitation here is that you can only choose a sub-domain from one of the DynDNS main domains, so your name would be something like "mysite.dyndns.net". But, free is free. You can always get your own personalized domain later (and a static IP).
If you use a dynamic name service like DynDNS, there will be additional configuration in your router so that it can broadcast your changed IP back to DynDNS, or you can install software on your host server to do the same. Note that the server/software version seems to be more reliable.
2. Port Forwarding
Now that you have that sorted out (router, and a name so people can find it), you then need to setup Port Forwarding through your router to the Sharepoint server inside your local network. Port forwarding "re-maps" the external port visible to the Internet to a port and server inside your network. Note that that the external port number can only be mapped once. You add a Port Forwarding rule from your Router Administration. Specific steps will vary based on system, but it will look something like this:
For Port 80 (HTTP, or default Webserver port), you will map that to the same port (unless you have defined a different port internally) on the static IP address for your internal server.
CAUTION: As you will be now exposing your internal server to the world, you want to make sure that it is properly maintained and fully patched to limit exposure to vulnerabilities that may be found in your web server (Windows Server with IIS in this case). You will also want to change "default" passwords on accounts on the server, turn off "Anonymous" login, etc. You will also want to make sure that either Remote Administration is turned OFF on your router (this is usually the default), or if you need to have remote access, use a strong password and possibly change the account name or setup a new admin account.
Tip: If someone does gain access to that server's OS (which will be quite unlikely, as you will be only exposing one port), they could access your internal network. You can increase protection of your network by placing that server in your "DMZ" (De-Militarized Zone), so that if someone does gain access to the server OS, they cannot access the rest of your network.
3. Configuring IIS for the external name
IIS will, be default, be setup with your internal server name. This will be different than your external domain (or subdomain) name, and for proper operation when accessing Sharepoint from the outside world, you need to tell IIS what it's external name is. Otherwise you will get binding errors when you try to change between certain types of pages.
On your Sharepoint server, open up the IIS Administration control panel.
Choose your website and click on Edit Bindings.
Click on Add... to add the binding for your external domain (or subdomain) name.
Enter the name and click on OK. In order to make the changes effective you should also do an IISRESET from a Command (DOS) prompt window, or use stop/start in the IIS control panel.
Those are the basics for getting your site accessible to your dispersed team. Note that there are other things you can do like setup SSL, for more secure connections, but that is not discussed here. You can, however do it with a "self-registered" certificate, which will pop up a warning to your users every time they go to your site (not desireable), or you can apply for an official registration certificate - but for this you will need to have your own domain and static IP.
Email and Sharepoint - Outbound, and Inbound
Now that our system is setup, with lists, workflows working (etc), and the site is now visible to your team, we can setup the email functions for Sharepoint.
There are several steps you need to do in order to do this. You will need to turn on the SMTP service on your Windows Server (this is not enabled by default), and then you need to configure the SMTP server and then Sharepoint to use it. And of course - you need to make your workflows email out messages.
Turning on SMTP
The sequence may vary slightly depending on your version of Windows Server, but in 2008 you would go to the Server Manager control panel, and select Features. If you see "SMTP Server" listed as an active feature, you don't need to enable it.
However if you do not see it listed, you will need to click on Add Features.
You will be asked to reboot the server after enabling the feature.
Configuring SMTP
In order to turn on the SMTP function, you next need to go to the Administrative Services and select IIS Services 6.0 (not the newer IIS panel). Expand your server until you see "SMTP Virtual Server".
Right-click on "SMTP" and Start the service.
Setting up Sharepoint
Next, open up Sharepoint Central Administration. Click on the Operations Tab and click on "Outgoing Email Settings".
Specify the internal static IP address for your Sharepoint Server. Specify the email address you want to be sending "from" and the "reply to" address, then click OK.
Note that if you already have a business email server under your domain, you will not necessarily need the SMTP service locally on your Sharepoint server - you can use the company SMTP server instead.
Incoming Email
You do not need to turn on incoming email unless you want to support automatic addition of email messages/attachments into Sharepoint. This is an advanced feature not discussed in detail in this session. But if you do need to setup incoming email, there are a few basic steps (then you are on your own with the Sharepoint documentation).
Setup
The simplest way to set this up is to use the SMTP service on your Sharepoint server. Click on the Incoming Email Settings link.
Set "Enable sites on this server to receive email" to "yes".
Next, specify the external domain name for the display address.
Setting up Lists/Libraries to accept incoming email
The following is the basic setup for enabling incoming email into a list or document library.
In Sharepoint, log in as a Site Collection administrator, and open the List or document library that you want to receive incoming email. Then click on Settings > [List Settings] or [Document Library Settings]. You will see a screen like this:
Click on Incoming e-mail settings.
There are a number of options on what to do with attachments, and email security (who can email into the repository based on their login and email, etc), but to start with you need to turn on the ability to receive incoming email, and specify the unique email address that will serve as the inbox for this list/library.
You can then test emailing to that email address and see items start showing up in the list. You can also get more advanced and setup iLoveSharepoint Event Receivers for processing incoming emails to do specific actions. Those are not covered here, but they use PowerShell scripting.
Advanced Email - Smart Hosting
This section applies specifically if you are using Dynamic DNS. If you are not using a registered domain with a static IP, there is the very real likelihood that you will operate fine, sending emails to your team for a month or two - and then you may find that suddenly your subdomain is blacklisted (they think you may be a spamming site).
There is a workaround for this, however - you can use a Smart Host to relay your messages through their email server. This is a multiple-step process. We used GMail as our SmartHost, as they support "sending email as <other email address>", though this requires verification from the "owner" address when you set it up.
Step1: Create a new GMail account.
Step 2: In Gmail, under Mail Settings, click on "Accounts and Import". In the section titled "Send mail as:" click on "Add another email address as your own". Specify the email address that you want to be sending FROM your Sharepoint server, i.e. sharepoint@mysite.dyndns.net.
Step 3: An email will be sent to your Sharepoint server. However, you need to go to the SMTP inbox folder to retrieve it (i.e. under C:\inetpub\mailroot\...). Open the message file and then verify the account association by going to the link in the email.
Step 4: On your Sharepoint server, open up IIS 6.0 Manager again. Right click on SMTP and select Properties. Click on the Delivery tab.
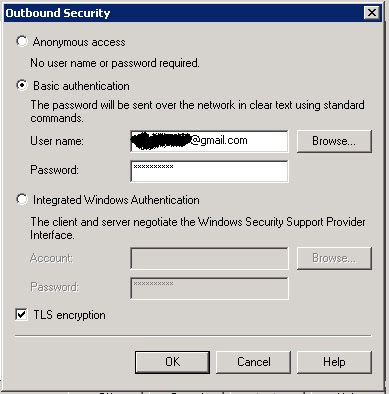
Step 5: Click on Outbound Security. Choose basic authentication and then enter the GMail address and password here and click OK.

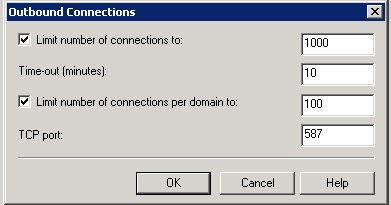
Step 6: Click on Outboud Connections. Make sure your settings look like this:

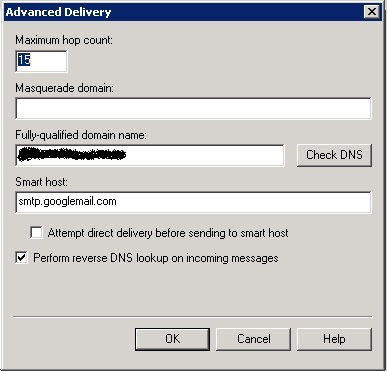
Step 7: Click on Advanced Delivery. Specify your fully qualified domain (subdomain) name, and the smarthost server (GMail).

That's it - you should be ready for emailing with no blacklisting!
Custom Workflows - Sending Email Notifications
When you create your custom workflows in Sharepoint Designer, one of the actions you can use is to Send an Email. You can choose who to email as a static account, or do lookups for user accounts based on a List Item (i.e. the owner of a task). In order to send an email, you will need three things:
1) Who to send it to
2) Subject line
3) Email body
If you want the email to contain variable subject text, i.e. include the name of the list item, you will need to setup a variable and then use that as the subject line.
In the action to send the email, you can specify the TO, CC, Subject and the email body.
To specify specific accounts, or lookup users, click on the icon to the right.
You can use username fields in the list (or related lists) as the source of your TO and CC. You can include multiple addressees.
Finally, supply whatever email body that is appropriate, You can include image links, variables and field lookups in order to complete your message, as well as static boilerplate text. You can also include HTML links back to your site, as in the above example.
That's it for this session, I hope you found it useful!
Coming next:
Part 8: Doing it Yourself - Recommendations
Part 9: Using what you've built - more free enhancements
Go back to:
Part 1: The Need
Part 2: Designing the Solution
Part 3: Building the Structure - Sharepoint Lists
Part 4: Process Workflow Design
Part 5: Implementing Custom Workflows with Sharepoint Designer
Part 6: Advanced Workflows with PowerShell
For more information or questions, contact:
Gary Nelson, PMP
www.gazzaconsulting.com


No comments:
Post a Comment